Springboot 프로젝트에 Spring Rest Docs 도입하기
본 포스트는 아래의 환경을 기준으로 작성되었습니다.
Springboot 3.0.1
Java 17
Gradle 7.6
API 문서화 도구의 필요성
다른 개발 팀원분들과 원활히 협업하기 위해서 API 문서화는 필수죠?!
API 문서화를 위해서는 도구를 사용하거나 개발자가 API에 대한 내용을 직접 작성할 수도 있습니다. 그러나 개발자가 직접 문서화하는 방법은 아무래도 사람이 수작업으로 하는 일이다 보니 수정 사항을 잊어버리고 반영하지 않는다거나 하는 상황이 발생할 수도 있습니다.
그렇기 때문에 API 문서화 도구 사용을 많이들 추천합니다.
Swagger VS Spring REST Docs
많이 사용하는 API 문서화 도구에는 Spring REST Docs와 Swagger가 있습니다.
(1) Swagger
- 장점
- Spring REST Docs에 비해 설정이 쉽다.
- API 문서에서 테스트가 가능하다.
- 다양한 진영에서 사용이 가능하다.
- 단점
- Production 코드에 Swagger 관련 코드가 함께 들어간다.
- 테스트 기반이 아니기 때문에 문서의 안정성을 보장해주지 않는다.
(2) Spring REST Docs
Spring REST Docs는 테스트 코드 기반으로 RESTful 문서 생성을 도와주는 도구입니다.
- 장점
- Swagger와 달리 Production 코드에 영향이 없다.
- 테스트를 통과한 API만 문서화되기 때문에 어느 정도 안정성을 보장할 수 있다.
- 단점
- Swagger보다 설정이 까다롭고 공식 문서 외의 레퍼런스가 많지 않다.
- 테스트 코드 아래에 이어 붙이는 형식으로 지원하기 때문에 테스트 코드의 양이 많아진다.
Spring REST Docs를 선택한 이유
(1) 테스트 코드 작성의 강제성(?)
Spring REST Docs는 테스트 코드를 통과한 API만 문서에 반영해 주는데요..!
진행 중인 프로젝트 기한이 8주로 정해져있기 때문에 8주 내에 테스트 코드까지 완벽하게 완성시킬 수 있을까에 대한 걱정이 있었습니다. 하지만 이렇게 강제적으로라도 테스트 코드를 작성하는 것이 어플리케이션의 안정성 및 실력 강화 측면에서도 도움이 될 것이라고 생각하였고 함께하는 백엔드 팀원분의 의견도 일치하여 Swagger 대신 Spring REST Docs를 선택하게 되었습니다.
(2) Swagger 사용 시 Production 코드에 Swagger 코드가 섞인다.
이전 프로젝트에서 Swagger를 사용하면서 가장 불편하다고 느꼈던 부분입니다.
쉽게 반영할 수 있고 원하는 내용을 문서화하기에는 편리했지만 그만큼 직접 Production 코드 위에 어노테이션을 통해 입력해 줘야 하는 부분이 많아 개인적으로 코드가 지저분해진다는 느낌을 받았습니다.
이러한 이유로 이번 프로젝트에는 Spring REST Docs를 사용하기로 했습니다.
Springboot에서 Spring Rest Docs 사용하기
(1) build.gradle
1
2
3
4
5
6
7
8
9
10
11
12
13
14
15
16
17
18
19
20
21
22
23
24
25
26
27
28
29
30
31
32
33
34
35
36
37
38
39
40
41
42
43
plugins {
    id "org.asciidoctor.jvm.convert" version "3.3.2"  // (1)
}

configurations {
    asciidoctorExt // (2)
}

dependencies {
    asciidoctorExt "org.springframework.restdocs:spring-restdocs-asciidoctor" // (3)
    testImplementation "org.springframework.restdocs:spring-restdocs-mockmvc" // (4)
}

ext {
    snippetsDir = file("build/generated-snippets") // (5)
}

tasks.named("test") {
    useJUnitPlatform()
    outputs.dir snippetsDir // (6)
}

asciidoctor {
    configurations "asciidoctorExt" // (7)
    baseDirFollowsSourceFile() // (8)
    inputs.dir snippetsDir // (9)
    dependsOn test // (10)
}

asciidoctor.doFirst {
    delete file("src/main/resources/static/docs")  // (11)
}

task copyDocument(type: Copy) { // (12)
    dependsOn asciidoctor
    from file("build/docs/asciidoc")
    into file("src/main/resources/static/docs")
}

build {
    dependsOn copyDocument
}
(1) asciidoctor에 대한 플러그인을 추가해 줍니다. 이 플러그인은 adoc 파일을 변환하고 build 디렉토리에 복사하기 위해 사용하는 플러그인입니다. gradle 7 부터는 이전에 사용하던
org.asciidoctor.convert대신asciidoctor.jvm.convert를 사용해야 합니다.(2) asciidoctorExt을 Configuration에 지정해 줍니다.
(3) dependencies에
spring-restdocs-asciidoctor를 추가해 줍니다. adoc 파일에서 사용할 snippets 속성이 자동으로build/generated-snippets를 가리키도록 설정합니다.(4) MockMvc를 사용하여 테스트할 예정이기 때문에
spring-restdocs-mockmvc도 dependencies에 추가해 줍니다.(5) snippets 파일이 저장될 경로를 설정해 줍니다.
(6) 출력할 디렉토리는 설정해 줍니다.
(7) asciidoctor에서 asciidoctorExt을 configurations로 사용하도록 설정합니다.
(8) .adoc 파일에서는 다른 .adoc 파일을 include하여 사용할 수 있는데 그럴 경우 경로를 동일하게 baseDir로 설정해 줍니다. Gradle 6 버전에서는 자동으로 해주지만 7부터는 직접 명시해줘야 합니다.
(9) input 디렉토리를 설정해 줍니다.
(10) build시 test 후 asciidoctor를 진행하도록 설정해 줍니다. (순서 설정)
(11) 중복을 막기 위해 새로운 문서를 생성할 때에는 전에 생성했던 문서들을 먼저 지워줍니다.
(12)
build/docs/asciidoc디렉토리에 생성된 html 문서를src/main/resources/static/docs디렉토리에 복사합니다.(13) copyDocument 후 build 지정
(2) RestDocsConfiguration
snippets을 좀더 보기좋게 생성하고 싶다면 prettyPrint()를 preprocessors에 걸어주면 되는데 이를 위해서는 RestDocumentationResultHandler의 write 메소드에 지정 후 Bean으로 등록해주면 됩니다.
또한 생성된 snippets를 class-name/method-name 디렉토리에 저장되도록 identifier를 설정해줄 수 있습니다.
예를 들어
1
MockMvcRestDocumentation.document("test")
라고 작성해주면 생성된 snippets는 build/generated-snippets/test 디렉토리에 저장됩니다.
아래의 코드는 테스트 코드를 작성한 {클래스명/테스트 메소드명} 으로 디렉토리를 지정해준 것입니다. (아래 예제를 통해 실제로 생성된 snippets의 경로를 보면 이해가 쉬울 것입니다.)
1
2
3
4
5
6
7
8
9
10
11
12
13
14
15
16
17
import org.springframework.boot.test.context.TestConfiguration;
import org.springframework.context.annotation.Bean;
import org.springframework.restdocs.mockmvc.MockMvcRestDocumentation;
import org.springframework.restdocs.mockmvc.RestDocumentationResultHandler;
import org.springframework.restdocs.operation.preprocess.Preprocessors;

@TestConfiguration
public class RestDocsConfiguration {
  @Bean
  public RestDocumentationResultHandler write() {
    return MockMvcRestDocumentation.document(
        "{class-name}/{method-name}", // identifier
        Preprocessors.preprocessRequest(Preprocessors.prettyPrint()),
        Preprocessors.preprocessResponse(Preprocessors.prettyPrint())
    );
  }
}
(3) AbstractRestDocsTests
RestDocs에 대한 설정을 모든 테스트 클래스의 setUp으로 동일하게 작성해 줄 필요는 없으니 abstract 클래스로 만들어 각 테스트 클래스들이 상속받아 사용하도록 만들어줍니다.
1
2
3
4
5
6
7
8
9
10
11
12
13
14
15
16
17
18
19
20
21
22
23
24
25
26
27
28
29
30
31
32
33
34
35
36
37
38
import static org.springframework.restdocs.mockmvc.MockMvcRestDocumentation.documentationConfiguration;

import org.junit.jupiter.api.BeforeEach;
import org.junit.jupiter.api.extension.ExtendWith;
import org.springframework.beans.factory.annotation.Autowired;
import org.springframework.context.annotation.Import;
import org.springframework.restdocs.RestDocumentationContextProvider;
import org.springframework.restdocs.RestDocumentationExtension;
import org.springframework.restdocs.mockmvc.RestDocumentationResultHandler;
import org.springframework.test.web.servlet.MockMvc;
import org.springframework.test.web.servlet.result.MockMvcResultHandlers;
import org.springframework.test.web.servlet.setup.MockMvcBuilders;
import org.springframework.web.context.WebApplicationContext;
import org.springframework.web.filter.CharacterEncodingFilter;

@Import(RestDocsConfiguration.class)
@ExtendWith(RestDocumentationExtension.class)
public abstract class AbstractRestDocsTests {

  @Autowired
  protected RestDocumentationResultHandler restDocs;

  @Autowired
  protected MockMvc mockMvc;

  @BeforeEach
  void setUp(
      final WebApplicationContext context,
      final RestDocumentationContextProvider restDocumentation) {
    this.mockMvc = MockMvcBuilders.webAppContextSetup(context)
        .apply(documentationConfiguration(restDocumentation))
        .alwaysDo(MockMvcResultHandlers.print())
        .alwaysDo(restDocs)
        .addFilters(new CharacterEncodingFilter("UTF-8", true))
        .build();
  }
}
(4) Test할 Controller 생성하기
이제 REST Docs 사용을 위한 설정은 끝났으니 잘 작동하는지 controller와 test를 작성해서 직접 알아봅시다.
정말 간단하게 String 값을 return해주는 Get 요청 API를 하나 만들었습니다.
1
2
3
4
5
6
7
8
9
10
11
import org.springframework.web.bind.annotation.GetMapping;
import org.springframework.web.bind.annotation.RestController;

@RestController
public class RestDocsTestController {

  @GetMapping("/restDocsTest")
  public String restDocsTestAPI() {
    return "test!!";
  }
}
(5) API 테스트 코드 작성하기
앞에서 작성한 API에 대해 테스트 코드를 작성해 봅시다.
원래 REST Docs 적용을 위해서는 andDo()를 사용하여 field에 대한 내용을 채워줘야하지만 상속받은 AbstractRestDocsTests에서 BeforeEach로 .alwaysDo(restDocs) 설정을 해주었기 때문에 RestDocumentationResultHandler가 알아서 실제 응답에 따라 API를 생성해 줍니다.
하지만 이렇게하면 description과 type에 대한 내용은 명시할 수 없기 때문에 필요에 따라 잘 사용하면 될 것 같습니다.
1
2
3
4
5
6
7
8
9
10
11
12
13
14
import org.junit.jupiter.api.Test;
import org.springframework.boot.test.autoconfigure.web.servlet.WebMvcTest;

import static org.springframework.test.web.servlet.request.MockMvcRequestBuilders.get;
import static org.springframework.test.web.servlet.result.MockMvcResultMatchers.status;

@WebMvcTest(RestDocsTestController.class)
class RestDocsTestControllerTest extends AbstractRestDocsTests {

  @Test
  void RestDocsTest() throws Exception {
    mockMvc.perform(get("/restDocsTest")).andExpect(status().isOk());
  }
}
(6) adoc 문서 작성하기
이제 adoc 문서만 작성하면 완성입니다!
앞에서 계속 봐온 Asciidoctor란 AsciiDoc을 HTML, DocBook 등으로 변환하기 위한 빠른 텍스트 프로세서(.adoc)로, 마크다운과 비슷한 문법을 가지고 있어 마크다운을 조금이라도 사용해본 사람이라면 금방 사용할 수 있습니다.
마크다운과의 가장 큰 차이점이라고 하면 source를 include 할 수 있다는 점입니다. 문서 결과물을 컴파일 과정을 수행하고 만들기 때문에 가능한 것이며 이로 인해 문서상 개발 코드를 작성하지 않고 실제 java, xml, properties 등등 여러 자원에 있는 내용을 가져와 보여줄 수 있어 실제 코드의 변경이 문서에 바로 반영할 수 있게 됩니다.
src/docs/asciidoc 디렉토리에 .adoc 파일로 작성해주면 됩니다.
(1) index.adoc
전체 코드를 연결해줄 홈 화면이라고 생각하면 됩니다. include를 통해 다른 파일을 연결할 수 있습니다.
1
2
3
4
5
6
7
8
= Spring REST Docs Test
:doctype: book
:source-highlighter: highlightjs
:toc: left
:toclevels: 2
:seclinks:

include::test.adoc[]
(2) test.adoc
RestDocsTestController에 대한 부분을 작성해 주었습니다. operation을 사용해 snippet의 디렉토리를 지정하고 뒤에 원하는 snippet 종류를 넣어주면 됩니다.
1
2
== RestDocsTestController
operation::rest-docs-test-controller-test/rest-docs-test[snippets="http-request,http-response"]
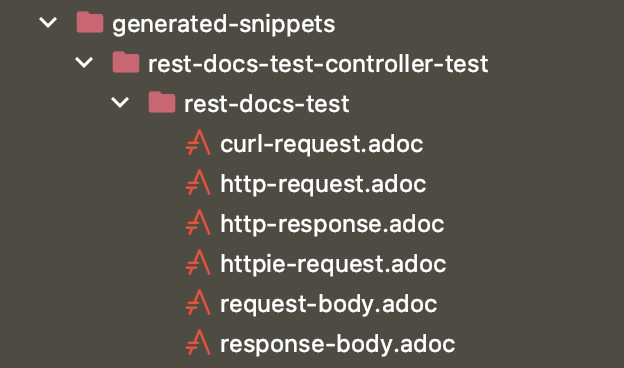
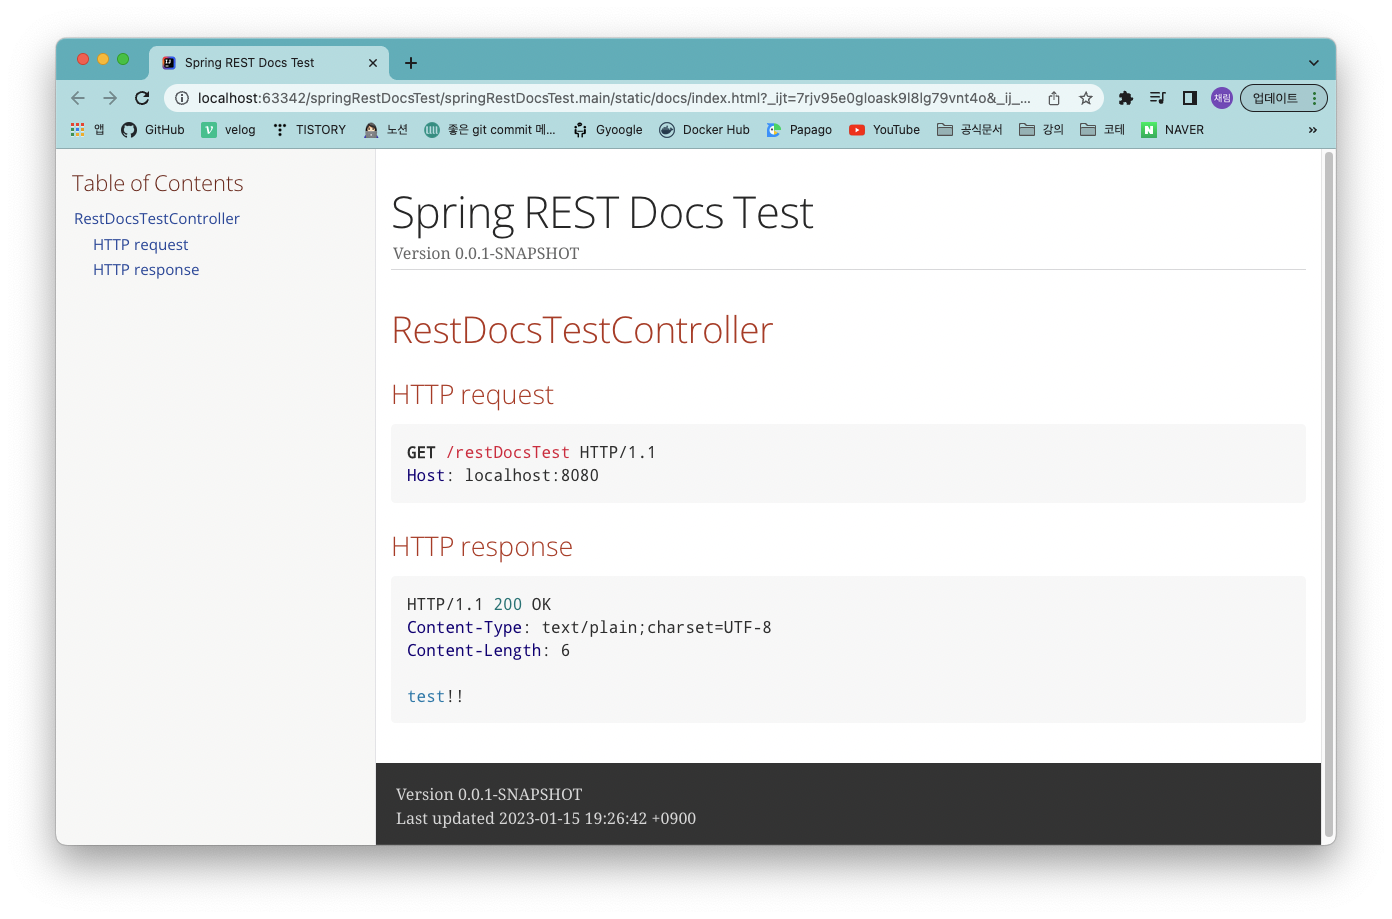
이렇게 모두 작성해주고 build하면 snippets이 생성되고 작성해준 adoc 파일에 따라 html 파일까지 지정해준 디렉토리에 잘 생성되는 것을 확인할 수 있습니다.
생성된 snippets
생성된 html 화면
참고
https://spring.io/projects/spring-restdocs
https://www.youtube.com/watch?v=BoVpTSsTuVQ
https://dingdingmin-back-end-developer.tistory.com/entry/Springboot-restdocs-%EC%A0%81%EC%9A%A9%EA%B8%B02-%EC%8B%A4%EC%A0%84-%EC%82%AC%EC%9A%A9
Comments